WordPress 5.2 gave us the Site Health screen, a convenient way for users to check on the vitals of their website. It performs some tests and also gives the option to copy all debug data to the clipboard for easy sharing.
However, four years later, very few plugin developers seem to utilize it. This is possibly due to the fact that documentation on it is very limited and hard to find. This may lead you to think that it is hard to work with the Site Health screen, but in fact it is actually very easy to hook into it.
The Tweet I recently wrote about this subject garnered a lot of response, which prompted me to write this more in-depth article.
Custom tests
To add a custom test we have to use the site_status_tests filter hook. There are two types of tests, direct tests and
asynchronous tests. Tests that take little time to execute can be executed directly. If a test takes more time to run,
its better to make it asynchronous.
Adding a “direct” test
function hsce_add_mbstring_test($tests){
  return array_merge_recursive($tests, [
    'direct' => [
      'hsce_custom_test' => [
        'label' => __('My custom plugin test'),
        'test' => 'hsce_do_test',
        'skip_cron' => false, //Do not run this test on cron
      ]
    ]
  ]);
}
add_filter('site_status_tests', 'hsce_add_mbstring_test');
The 'test' => 'hsce_do_test', key points to a function (the value should be a function callback). That function
should perform the test and return the results. Let’s create a testing function that checks if the mbstring PHP extension is
loaded and the mb_strimwidth() function is available (…disregarding the fact that one of the built-in tests already
checks if mbstring is enabled):
function hsce_do_test() {
$mbstring_enabled = extension_loaded('mbstring') && function_exists('mb_strimwidth');
$status = $mbstring_enabled ? 'good' : 'recommended'; //Also available: critical
$label = $mbstring_enabled ? __('mbstring is enabled') : __('mbstring is not enabled');
$description = sprintf('<p>%s</p>', $mbstring_enabled ?
__('Description when test successful') :
__('Description when test failed')
);
return [
'label' => $label,
'status' => $status,
'badge' => [
'label' => __('My Custom label'),
'color' => 'blue', //Choice of blue, green, red, orange, purple or gray
],
'description' => $description,
'actions' => sprintf('<a href="#">%s</a>', __('Check the plugin log')), //Link or button (HTML) where the user can find additional info
'test' => 'hsce_custom_test'
];
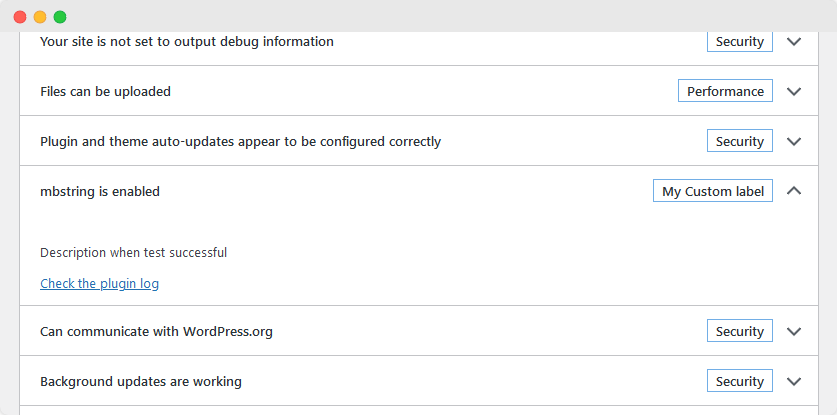
}The result should look like this:
Adding an asynchronous test
Adding an asynchronous test is a bit more involved. With asynchronous tests, WordPress will make a request to an Ajax endpoint to run the test, so it won’t slow down the page.
Asynchronous tests are registered like this:
function hsce_add_async_test($tests){
    return array_merge_recursive($tests, [
        'async' => [
            'hsce_custom_async_test' => [
                'label' => __('My custom async test'),
                'test' => 'hsce-async-test',
                'skip_cron' => false,
                'has_rest' => false,
                'async_direct_test' => 'hsce_do_async_test',
            ]
        ]
    ]);
}
add_filter('site_status_tests', 'hsce_add_async_test');
In this case the 'test' => 'hsce-async-test', does not expect a function callback, but a string with the name of your
Ajax callback function. Note that you should use dashes and not underscores.
'async_direct_test' => 'hsce_do_async_test', points to the test function directly and should be a function callback.
This is used when the test is ran in the background.
The definition of the test itself is the same as in the Adding a “direct” test section above.
All we have to do is register an Ajax endpoint for it:
function hsce_ajax_async_test(){
    if(!wp_verify_nonce($_REQUEST['_wpnonce'], 'health-check-site-status')){
        wp_send_json_error(__('Invalid nonce'));
    }
    wp_send_json_success(hsce_do_async_test());
}
add_action('wp_ajax_health-check-hsce-async-test', 'hsce_ajax_async_test');
Note that WordPress also adds the health-check- prefix to the Ajax action name before your test name. This had me
scratching my head for a while when my test wouldn’t get triggered.
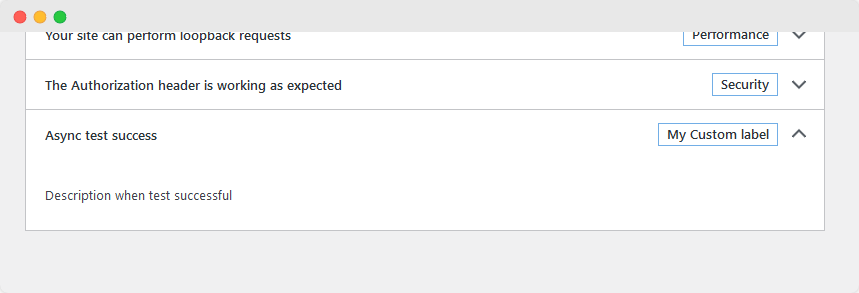
After registering the Ajax endpoint, your test should show up at the bottom of the tests list:
Adding a section to Info tab
Adding a custom section to the Info tab is really easy. You can do this by adding a function to the debug_information
action hook like so:
function hsce_add_debug_info( $debug_info ) {
$debug_info['my-plugin-slug'] = [
'label' => __( 'My Plugin Custom Info Section'),
'fields' => [
'mysetting' => [
'label' => __( 'My custom setting'),
'value' => get_option( 'my-plugin-setting', __( 'Setting not found') ),
'private' => false,
],
],
];
return $debug_info;
}
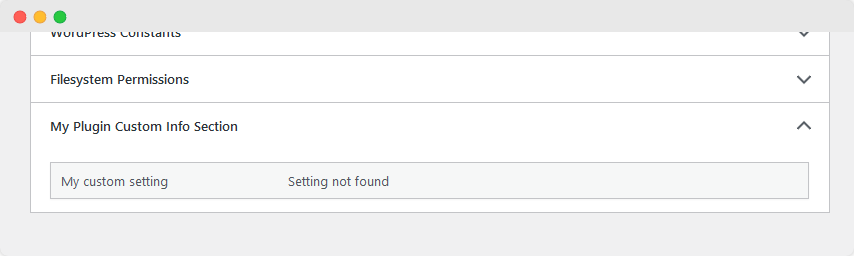
add_filter( 'debug_information', 'hsce_add_debug_info' );This should add your custom section to the info tab:
Conclusion
And that’s how you add custom tests and debug info to the WordPress Site Health page!
You can find a fully working example plugin on my GitHub page.
I’m curious to see how you’ll implement this into your plugins! If more developers implemented this we could all point users into the same direction for getting debugging info.
Having said that, we should aim to keep it useful and not clutter it up with commercial messages or useless tests/debug info.
Don’t forget to share this if you found this useful, and follow me on Twitter for more guides like this!